Meet Martha, the Mother of Mini-Mushroom Fruiting Chamber!
So what does a mushroom fruiting chamber and Martha Stewart have in common?
Absolutely nothing. Yet somehow, Martha Stewart has found a way to infiltrate mycology.
And if you ever find yourself growing enough mushrooms that you need a mini-greenhouse, well, you’ll probably meet “Martha” the Mushroom Fruiting Chamber.
Named after a Martha Stewart-branded hanging closet...
The “Martha” is any small-sized mushroom fruiting chamber with shelves, a synthetic (typically reinforced plastic), non-porous cover to retain humidity, and a zip up curtain so you can access the inside.
Go ahead. Google “Martha mushroom fruiting chamber” and see what you find.
You’ll soon discover that there are a million ways to make one and a million opinions of what works best, from simple units for less than $100 to tricked out builds costing over $1,000. The rabbit hole is deep and gets overwhelming fast.
Below you’ll find everything you need to build a low-maintenance, almost fully automated Martha Mushroom Fruiting Chamber that costs less than $200 and includes components that can be useful for a much larger grow roomshould you decide to go that route in the future.
Try our Mushroom Cultivation Course for FREE
Welcome to the Martha Fruiting Chamber Show. Let’s get started!
Plastic tray/pan the size of your greenhouse footprint
Perilite
One roll of fine mesh screen
HUMIDIFICATION
PVC pipe or flexible duct, 2 inches (5cm)
PVC “T”, 2 inches (5cm)
PVC elbow, 2 inches (5cm)
Vicks Cool Mist Humidifier
Inkbird hygrometer
EXHAUST
3-4 inch (7-10cm) waterproof fan
3-4 inch (7-10cm) waterproof fan
1-minute timer
Power strip
OPTIONAL
2 rolls of 6500k LED LED lights
4 inch (10cm) air diffusing ventilation ports
TOOL LIST
Knife
Scissors
Duct Tape
Marker
Zip ties
Measuring Tape
Something capable of cutting PVC pipes e.g. handsaw, miter saw or PVC cutter. Many hardware stores will cut your pipe for free
General Parameters for a Martha Mushroom Fruiting Chamber
Humidity
80% to 95% Relative humidity
Fresh Air Exchange (O2 vs CO2 levels)
4 to 6 fresh air exchanges per hour
Temperature
50°F to 70°F (10°C to 21°C)
Lighting
12 hour cycles of light/dark
The Contradictions of Martha
Mushrooms love oxygen but exhale carbon dioxide. Mushrooms love humidity but need constant fresh air exchange. Mushrooms love light but grow best at moderate, steady temperatures.
How do you provide fresh oxygen and exhause out the carbon dioxide (and spores)?
How do you continuously circulate fresh air within your greenhouse while maintaining a constant high humidity level?
How do you provide lighting without overheating?
You get creative, dammit!
Below, we’ve explained exactly how to build out a Martha Mushroom Fruiting Chamber. each section pertains to a certain system operating within your design (humidification, fresh air exchange, lighting, etc).
Humidification
Step 1: Buy equipment and tools, prepare workspace
Assemble your equipment and tools, and prepare your workspace.
Remember that most mushrooms like temperatures in the 50°F to 70°F (10°C to 21°C) range. If you’ll be growing in a space that’s warmer than that, consider adding a small air conditioning unit to your list. If it’s quite cold, consider adding a reptile heating map, which you can place at the bottom of the greenhouse. Mushrooms will grow outside this temperature range. It just won’t be optimal.
Step 2: Assemble greenhouse and water catching tray
Assemble your greenhouse, tying down the wire shelves to their support beams using zip ties or forgoing the shelving completely if you plan to make grow bags large enough to sit securely atop the support beams. You will want to position your greenhouse near a window or in any place where you can easily exhaust to the outside (more on this later). Once assembled, place the greenhouse atop the plastic tray or pan. Make sure the bottom of the greenhouse’s exterior is tucked inside the pan so any excess condensation along the inner walls of the greenhouse will collect in the pan. Spread a thin, even layer of perlite across the tray.
Tray with perlite spread in an even layer across. Note the exhaust fan is in the bottom left corner. The humidifier expells humidity through pipes on the opposite (right) side.
Step 3: Decide where to place your humidifier and ducts/pipes on your fruiting chamber
Position your humidifier along one side of your greenhouse. Draw two circles along the greenhouse’s lengthwise exterior, one about halfway up the greenhouse and another hole near the top. This is where you will pipe in your PVC pipe so that humidity from the humidifier will go through the pipes and into your greenhouse. This does not need to be exact. It will serve as a visual aid only.
Step 4: Assemble humidifier, measure from humidifier to first hole
Assemble your humidifier, fill with water, and turn on to make sure it works. Turn off. Measure the distance from the component of your humidifier where the humidity is expelled to the first circle halfway up your greenhouse. You want to cut your PVC pipe to about this length. Keep in mind that you will be attaching a PVC “T” piece here so the pipe can turn 90 degrees and enter the greenhouse. We recommend attaching the “T” to the end of your uncut PVC pipe to measure how much additional length it adds, then incorporating that figure into your measurement.
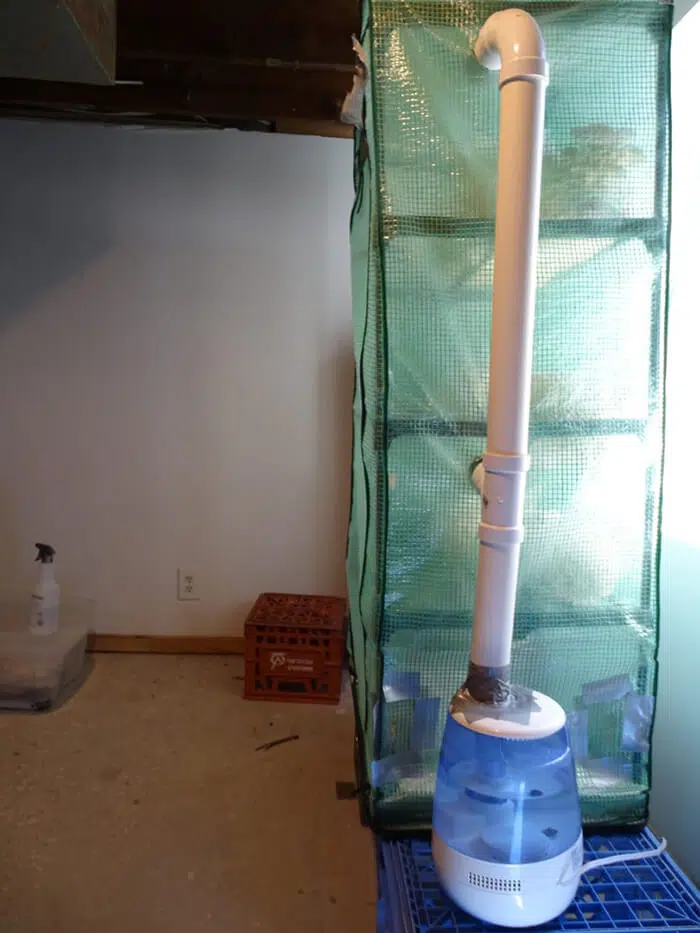
Humidifier with 2-inch (5cm) PVC pipe taped over the humidity expeller component
Step 5: Cut Duct/PVC pipe, attach to humidifier, attach PVC pipe “T”, pipe into greenhouse
Cut your PVC pipe to size, then attach one end to your humidifier’s humidity expeller component using silicone or duct tape. Attach the PVC “T” to the other end of the PVC pipe. Measure the length of pipe you will need to go from the “T” into the greenhouse. Then, cut this small piece and attach it to the “T.” You should now have a PVC pipe going from your humidifier up the side of your greenhouse about halfway, then turning 90 degrees and hitting the exterior of greenhouse. Where it hits the exterior, cut a circular hole so the pipe fits snugly within and enters the greenhouse.
Step 6: Cut Duct/PVC pipe, attach to PVC elbow, pipe into greenhouse
Measure from the “T” to the second hole near the top of your greenhouse (remember to account for the additional length of the PVC elbow). Cut the pipe to size. Attach one end of the pipe to the “T.” Attach the PVC elbow to the other end of the pipe. Measure the length of pipe you will need to go from the elbow into the greenhouse. Then, cut this small piece and attach it to the elbow. You should now have a PVC pipe going from your humidifier up the side of your greenhouse about halfway, turning 90 degrees at the “T”, entering the greenhouse, and a pipe exiting the other end of the “T’ and continuing upwards until it turns 90 degrees near the top of the greenhouse. Where the pipe exits the elbow, directs toward the greenhouse, and hits the exterior of greenhouse, cut a circular hole so the pipe fits snugly within and enters the greenhouse.
Step 7: Confirm you didn’t screw up
Step back and observe your mushroom fruiting chamber. Make sure it looks similar to the photo below.
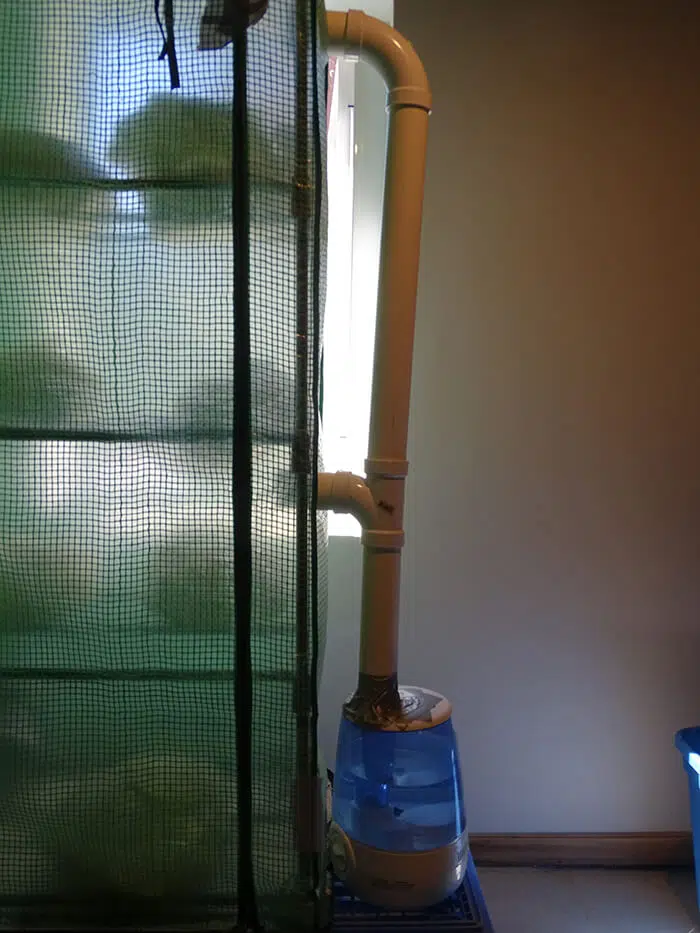
Completed humidification system from side of Martha, the Mushroom Fruiting Chamber
Step 8: Test out humidifying system
Turn on your humidifier. Make sure humidity does not leak from where the PVC pipe connects to the humidity expeller. Open your greenhouse and make sure humidity is entering the greenhouse from both pipes. If the flow of humidity from both pipes is not even (it probably will not be), consider covering part of the lower pipe with tape, a mason jar lid, or whatever else works and will be easy to clean/detach. This will force more air up to the highest pipe, evening out the flow. If you are only fruiting a few bags at a time, this last step may not be necessary. If you plan to fruit a lot of bags, you will want to do this to ensure even humidity dispersal throughout your Martha Mushroom Fruiting Chamber.
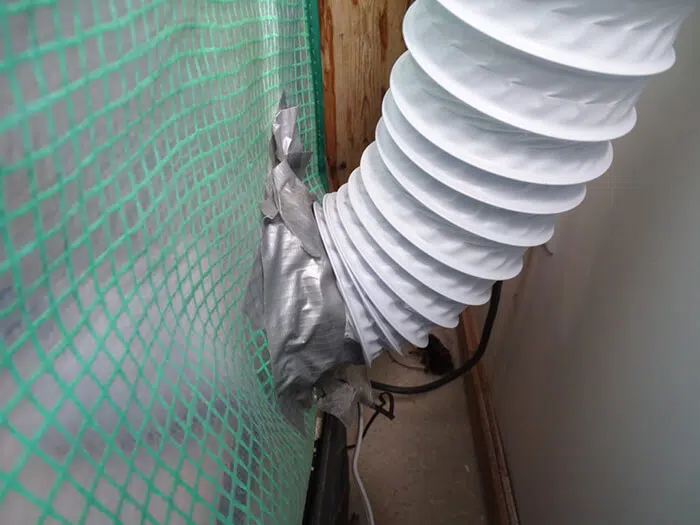
On left, PVC pipes expel humidity into Martha at two different points (halfway up and near the top).
On right, note that a piece of duct tape covers half of the opening of the PVC pipe situated halfway up the martha. This covering helps push humidity up the pipe to the second, higher outlet near the top of the martha.
Try our Mushroom Cultivation Course for FREE
fresh air exchange
word to the wise
Mushrooms release millions, billions, and sometimes trillions of spores, called a “spore load.” OysterandReishimushrooms have especially prolific spore loads. Inhaling this load is not good for your lungs. YOU NEED TO EXHAUST YOUR GREENHOUSE TO THE OUTSIDE. Ok, now that that’s handled, let’s show you how to do this.
Step 1: Text exhaust fan, measure from greenhouse to outside
Attach your exhaust fan to the controller/connector and plug it into a power outlet. Make sure it works. Turn off. Disconnect from the power outlet.
Next, take a measurement starting from the back, bottom corner of your greenhouse exterior opposite the side of your humidifier, and ending at the outside/window where you will exhaust your greenhouse air.
4-inch (10cm) flexible ducting exiting the lower left-hand corner of the greenhouse and piping spores and air to the outside.
Step 2:
Place one end of your duct up to the bottom corner of the greenhouse where you just took the measurement, and trace a circle around the duct onto the greenhouse exterior. This is the size and shape of the hole you will cut. Cut the hole. Next, cut a piece of duct long enough so that it will extend into the greenhouse about 2 to 3 inches (5 to 7.5 cms) and have a 2-3 inch length protruding outside the greenhouse.
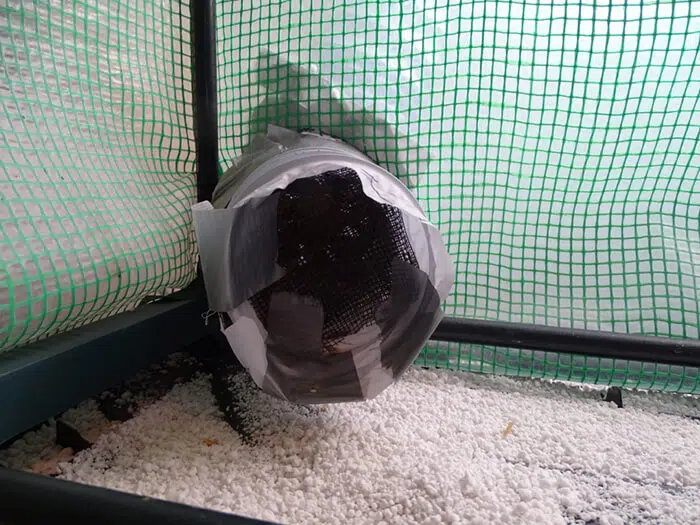
4-inch (10cm) flexible ducting entering the greenhouse in the lower left-hand corner. The exhaust fan is located about 3-inches (7.5cm) deep into the duct, at the point where the ducting enters/exits the greenhouse’s exterior.
Step 3:
Take the ducting you just cut and the exhaust fan and slowly slide your exhaust fan into the duct so the fan sits at the halfway point. This is your inline exhaust fan set up. Turn on the fan to ensure it can spin without being impeded by the ducting. Slide the duct into the hole you cut in Step 2 in your greenhouse. You want the fan to sit inside the duct at about where the duct crosses from the interior to the exterior of the greenhouse.
Step 4:
All you need to do now is attach another piece of duct to the piece you just made so the air and spores can exhaust outside. Cut another piece of ducting to the length you measured in Step 1. Give yourself a little extra moving room by adding a foot or two to this measurement. Attach one end of this piece to the small duct with the fan inside that you built in Step 3. Duct tape works great for this.
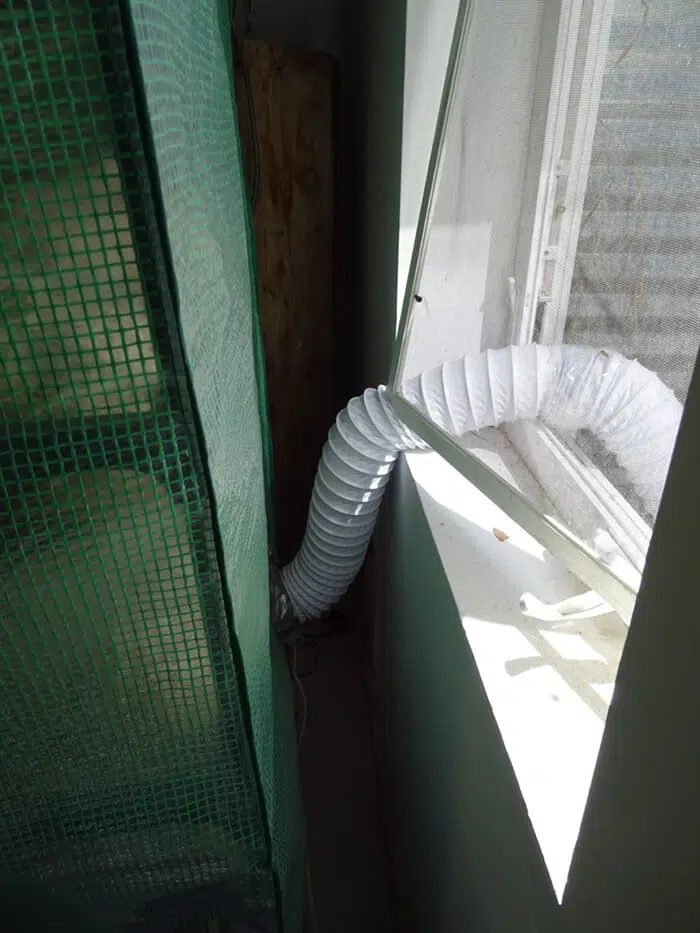
4-inch (10cm) flexible ducting exiting the greenhouse in the lower left-hand corner. The duct tape is there to seal the hole and connect another length of ducting to the fan, which then pushes air and spores outside.
On the other end of the duct that will go outside, tape a piece of fine mesh screening to cover the hole. This will prevent bugs from entering your greenhouse when your fan is off. Now take the duct and find a way to position it outside. In an ideal setup, only the duct will go outside and any other opening will be screened off or covered with something like plexiglass so bugs can’t get in and the spores being exhausted won’t blow back inside when it is windy. Step back and admire your work. You’re almost done.
lighting
You can provide light to your Martha Mushroom Fruiting Chamber by placing it near a window that receives indirect sunlight for about 12 hours/day.
If that is not possible, you can buy 2 rolls of waterproof, 6500K LED lights that turn on for 12–18 hours per day, using a digital timer to regulate when the lights turn on and off.
Setting up your Lights
Starting in the back top corner of the greenhouse, run an LED strip down one vertical post of the frame to the bottom of the post, then across one bottom beam, then up the other vertical post, that runs parallel to the first. Use zip ties to secure the LED strip to the posts. Then use the second roll of lights to do the same thing on the other two vertical posts and bottom support beam. Make sure your lights are directed toward the center of the greenhouse. Also, make sure you start the strip in such a way that the power source plug is in an upper corner of the greenhouse so it can exit out the greenhouse and into a wall power outlet.
Martha Mushroom Fruiting Chamber situated in indirect sunlight.
fresh air intakes
Using the humidifier we recommend, you will already get some fresh air exchange every time the humidifier runs as that model pulls air from the outside environment. But this is oftentimes not enough oxygen, especially inside homes (where carbon dioxide levels are higher than outside) and especially with Oyster mushrooms, which are sensitive to carbon dioxide. To provide additional oxygen, your fresh air intake system can be as simple as slicing a few slits along the bottom, middle, and top of your greenhouse, then covering them with fine mesh screening to prevent bugs from entering. Or, you can get a bit more technical and invest in a few 4-inch (10 cm) air diffusing ventilation ports. Either way, the goal is to provide some passive fresh air exchange while keeping out bugs.
Vicks Filter-Free Cool Mist Humidifier, V4600
A small, 2-inch (5cm) slit for passive air intake, covered with mesh to prevent bugs from entering. I know, it's a sloppy tape job...but it works.
automating your martha
Exhaust Fan
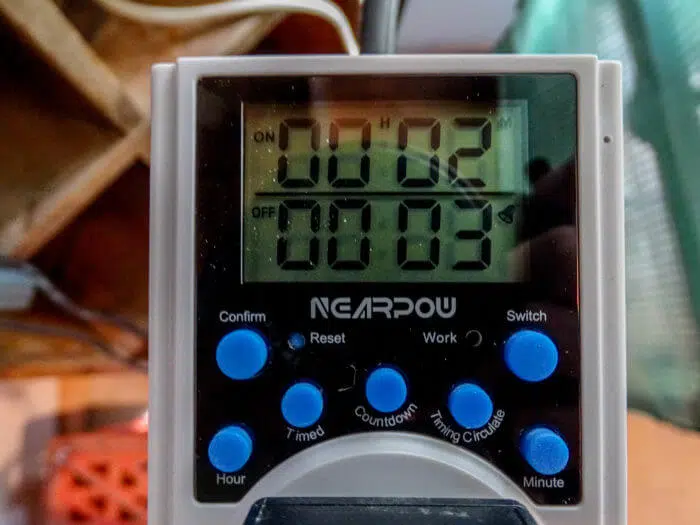
Plug your exhaust fan into the digital minute timer on the equipment list. Follow the instructions in the box to set up the timer. Everything will depend on your individual set up (how many grow bags, what species, location in house, ambient oxygen and carbon dioxide levels) but a good baseline timer set up is 2 minute on followed by 3 minutes off, repeating.
Nearpow 1-minute digital timer, set to turn on for 2 minutes then turn off for 3 minutes, repeating. Note the “02” on the top line and “03” on the bottom , denoting these time settings.
Humidification
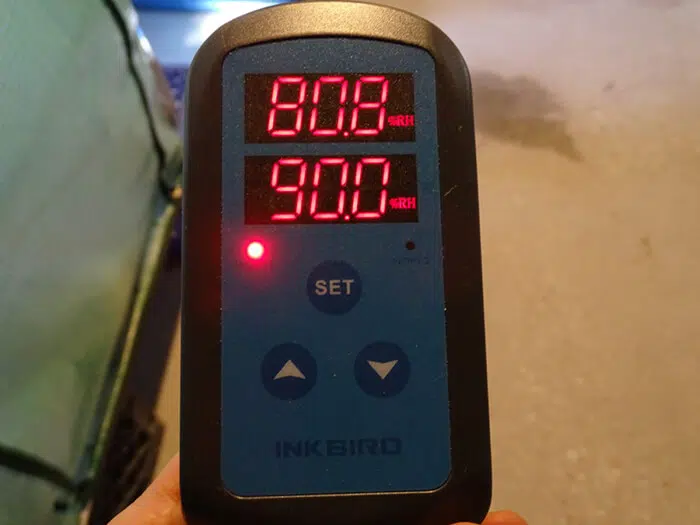
If you purchased an Inkbird, simply follow the directions or watch a couple Youtube videos to learn how to calibrate it (basically putting the sensor in a sealed plastic bag with a wet paper towel for a half day, which should be around 100% humidity). Then, plug your Inkbird into your power strip, set your parameters as explained in the directions, and plug your humidifier into the Work 1 outlet. You want to position your sensor away from the humidifying pipes. Sensors don’t do well when overly wet. We recommend positioning it in the top corner of the greenhouse on the side furthest from the ducts/PVC pipes. This way, if it reads 90% humidity, you know it is 90% throughout (and probably a bit higher closer to the ducts/PVC pipes). As for parameters, check our recommendations at the beginning of this post but remember that your mushrooms will always be the best indicator. Our differential is typically set at 5%, meaning that once the humidity drops 5% below what we have it set to (85% or 90% depending on the species), the humidifier automatically turns on.
An Inkbird IHC-200 Humidity Controller set to 90% relative humidity, with a current reading inside the greenhouse of 80.8%. Note the red light is on because the humidity reading is low and has kicked on the humidifier.
The humidifier is plugged into “Work 1,” which causes it to turn on when the humidity drops too low. “Work 2” is for plugging in a dehumidification system, which is unnecessary for use in a Martha Mushroom Fruiting Environment.
maintaining your martha
Put about one tablespoon of H2O2 (30% concentration) into your humidifier every time you refill it with water. Refilling the humidifier every few days is the only maintenance you have to do, which is why we call this setup “almost” fully automated. Also, be sure to completely clean your Martha Mushroom Fruiting Chamber at least once every 2 months, and more if you’re growing Oysters, which can pepper everything with spores and make a mess. Use bleach water to wipe everything down (shelves, poles, greenhouse interior and exterior), then rinse off, and let dry. Wipe down your exhaust fan blades and replace the fine mesh screen if it is dirty. Wipe down the tray with bleach water and replace the perilite, too.
conclusion
There you have it. Accumulate the equipment, read over this article as you build, and you’ll have a nearly fully automated Martha Mushroom Fruiting Chamber stocked full of mushrooms in no time! But don’t let our design keep you from getting creative with your own. There are more budget conscious options (skip the humidification system and just manually mist 3-5 times/day), ways to fully automate (hint: having an extra water reservoir with a float valve that automatically refills your humidifier), and even better ideas out there that we haven’t even conceived of yet! Ifmycology is to keep progressing and expanding, it’s on all of us to keep finding better ways.
about the author
Samis a writer, award-winning journalist and professional mycologist from the United States who arrived at the Fungi Academy one midsummer’s day in 2019 and left six weeks later with lifelong friends and a passion for mushroom cultivation.
In the past year three years, he’s built a laboratory and fruiting room in his home, cultivated and foraged over 20 species of gourmet and medicinal mushrooms, started a medicinal mushroom tincture business and returned to the Fungi Academy to teach his techniques to students.
60% Off
Instead of cluttering your life with more earthly possessions, why not embark on a celestial adventure and explore the wonders of the Fungal Universe?
We use cookies BECAUSE WE LOVE COOKIES🍪🍪🍪🍪. COOOKIES THEY ALL BELONG TO US🍪🍪
If you continue to use this site we will assume that you are happy with us eating all your cookies! COOKIES🍪