
A still air box is a clear plastic storage tote with two arm holes cut in the sides. It costs under $20 and takes 10 minutes to make. By trapping still air inside, it creates a semi-sterile workspace that dramatically reduces contamination when inoculating grain jars, pouring agar plates, or working with liquid cultures — all without the cost of a flow hood.
How to Make a Still Air Box: The Ultimate Guide
Updated May 2025
The start of many people’s mushroom cultivation journey begins with a DIY Still Air Box, and there are many reasons for that! For one, mycology is oftentimes a passion project or hobby that attracts people with a bare-bones budget and a do-it-yourself attitude.
And though mycology is undergoing a period ripe with innovation, for a long time people had two options for conducting sterile mushroom cultivation lab work: a $20 Still Air Box or a $500+ flow hood.
Considering that a Still Air Box for mushrooms can be made in 10 minutes for less than $20 with equipment many people already possess, the choice for many growing mushrooms at home is quite simple. So, we thought we’d offer a brief crash course in the science and art of the Still Air Box DIY.
Below, you will come to understand how Still Air Boxes work, the different design considerations to take into account, our favorite design — hint: the easiest and cheapest option with a twist tailored to the novice grower — how to make one, and how to put it to use. To the mushroom mobile we go!
How Does A Still Air Box Work?
We won’t go super deep here because there’s no need. The name Still Air Box is quite self-explanatory.
In short, the concept is that the inside of the Still Air Box — when cleaned and sterilized properly — is a still air, semi-sterile setting where stray floating fungal, viral, and bacterial bits can’t penetrate or tumble down from above. When you’re working with a sterile, nutrient-dense substrate, that’s paramount. By preventing unwanted intruders and keeping the area still and sterile, a Still Air Box lowers your chance of contamination and increases your chance at success.
How to Design a Still Air Box
First things first, do not and we mean do not build gloves into your still air box! It’s completely unnecessary, a waste of time, and they are extremely onerous to work with. Don’t believe us? Try wrapping 40 Petri dishes in parafilm with dishwashing gloves on then get back to us.
With that out of the way, it’s pretty simple.
Make sure you position the holes where you insert your hands and arms into at a comfortable width and height for your body. Everybody is different. Remember that some days, you may spend a couple hours working in your Still Air Box. Comfort is important here.
Also decide where you want the holes to terminate. Would you prefer them at the bottom of the tub sidewall so that the bottom of the hole ends at the surface you’ll be working on, or do you want the holes a bit higher up on the plastic container’s sidewall so that there’s a slight lip between the bottom of the armhole and the surface you’ll be working on?
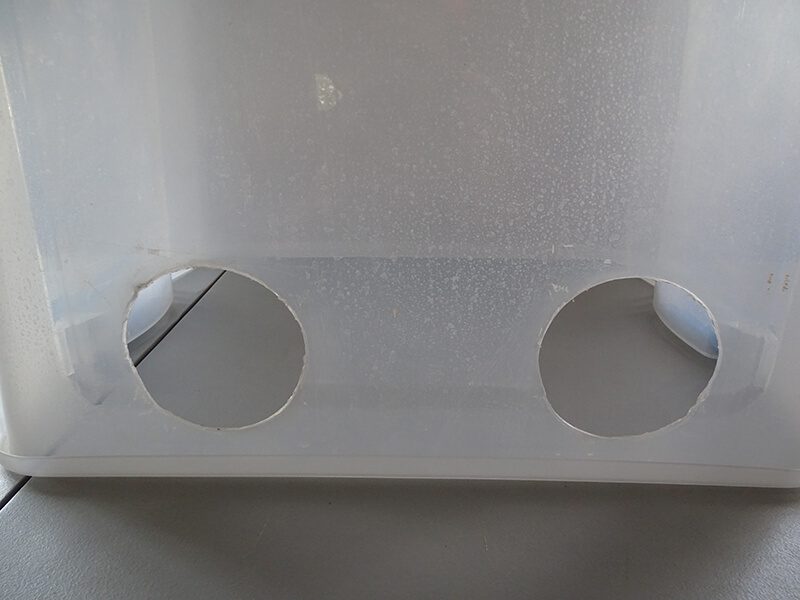
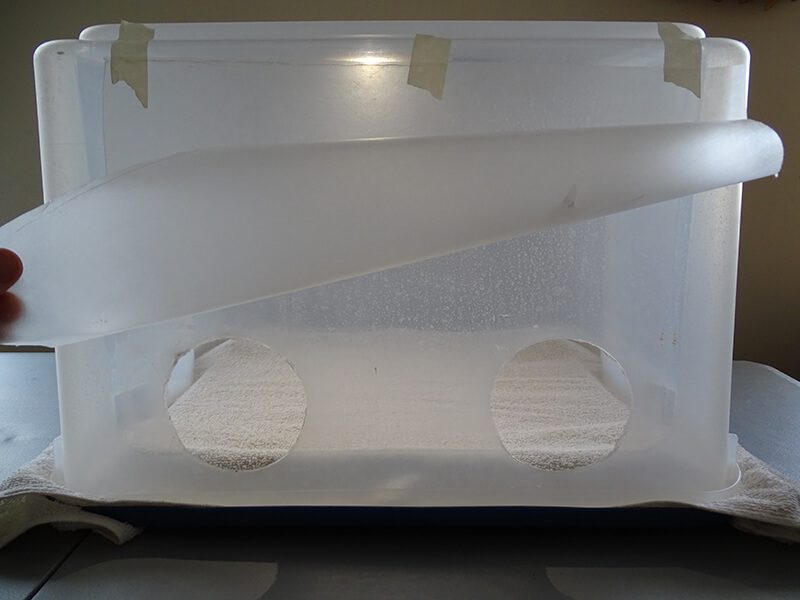
As you can see in the photo above, there is a slight lip in this Still Air Box design. I did it this way so the tub could still completely lock into the top snuggly and securely. For that benefit, I sacrificed a bit of comfort.

Free Beginner’s Guide
Grow your first mushrooms — for free
Get the free guide that walks new growers through the whole path — plus 5 free videos to send you on your way.
- The exact gear you need — and the pricey stuff you don’t
- Where to source spores & cultures without getting scammed
- How to spot and beat contamination before it wipes out your grow
How to Build a Still Air Box: Our Go-To Design
Some days I reminisce about the old days working in a Still Air Box on my knees atop the toilet seat in my friend’s tiny basement bathroom with four other roommates. Suffice to say, the conditions were not ideal. Yet contamination really wasn’t an issue. How? I did my research and found a great Still Air Box design for beginners. And now, I’m here to share it with you. Let’s break it down.
Still Air Box Equipment List
- Clear, plastic storage container with locking top, between 80 to 110 quarts large (the higher the height and wider the base the better)
- A gasket is optional but will make your Still Air Box for mycology even more secure and airtight
- Metal container, like a bean can, with at least 4″ diameter base for making arm holes
- Some type of heating element (butane torch, stovetop, etc.) for heating your bean can
- Sharpie marker
How to Make a Still Air Box — Step by Step
Step 1:
Gather the supplies on the equipment list.
Step 2:
Take your Still Air Box plastic container and place it on a desk upside down. Sit down in front of the plastic container and pretend you’re rolling a joint. Let your arms, elbows, and hands naturally fall where they may as you mimic writing.
Using one hand, lift the plastic container (which should be upside-down) and place it over your arms. Your other hand should still be in the rolling position and situated in the center of the container.
Now go ahead and make a marking with your Sharpie marker where your arms and the bottom edge of the container meet. That marking represents the correct width for making the armholes.
Using your marker, draw circles on the plastic container sidewall where you want to make the armholes. As we mentioned before, the height of the holes is up to you.
Pro Tips
1. Some people like to make their holes at the very bottom edge of the container so that the hole’s bottom edge ends where the working surface begins. Done this way, you eliminate the plastic lip between the bottom of the holes and the table.
I’ve never done it this way because cutting out the lip without cracking or damaging the container is much more difficult than simply pressing a can into plastic and melting your way through one layer of plastic. I also like to be able to completely lock the container to the container’s locking top so that it’s as snug and airtight as possible. I have never encountered any issues with the slight lip but I understand some people do have discomfort.
2. The most important part of making the holes is getting the width right. It’s better to position the holes a bit too wide rather than a bit too narrow because it’s much more natural (and comfortable) for your elbows to rest in a position wider than your hands than it is to have your elbows narrower than your hands. I messed mine up the first time and would get cramps in weird locations in my shoulders after about an hour of Still Air Box lab work.
Step 3:
Grab your bean can, metal coffee container, or whatever you have available that is around 4 inches in diameter, can be heated without melting (e.g. metal), and holds no value to you. Now, we’re going to burn that puppy up!
Step 4:
Heat the bottom of the can until it’s really hot. “Really hot” is science speak for “hot enough to burn your hand really bad” hot. Obviously, handle this with care!
[Watch: How to Make a Still Air Box Video]
Step 5:
Once it’s “really hot,” press the can into the plastic container where you made your arm hole markings. Remember, when you make a Still Air Box, the bottom of the plastic container becomes the top of the Still Air Box. So, make sure your container is upside down! The can should burn through the plastic relatively easy if you apply a bit of pressure.
Step 6:
Wait for the hole sides to cool down, then gently sand/scrape/smooth out the inside of the holes so there aren’t any snags or sharp edges that can cut you.
Step 7:
Step back and enjoy the fact that you just made a Still Air Box capable of sterile lab work for like $20 in 10 minutes. Maybe you even have an extra joint lying around now, too, and some beans in the fridge. A Still Air box, a joint, and a can o’ beans dinner. You’re living the life, my friend.
Step 8:
Smoke your joint, eat your beans, and then come back here! We’re about to teach you how to set up your Still Air Box next!
Why Does Sterile Technique Matter When Cultivating Mushrooms?
A common question we hear is, “If fungi can grow all over the world in the unsterile, open forest air, why do we need sterile technique to grow them in a clean room under perfect growing parameters?”
The answer is a matter of percentages. When you walk through a forest, you’re inhaling millions of fungal spores as you hike around. In the forest, most of those spores won’t successfully germinate, turn into mycelium, or end up as mushrooms. But that’s not a huge deal. There are literally billions of them floating around. Eventually, one of them will be successful, mature into a mushroom, and then release a million or billion more spores — spore loads are species dependent — into the air. In this scenario, the fungus needs just a 1 in 1,000,000,000 chance to reproduce successfully.
In mushroom cultivation, we’re aiming for a 95 percent or higher success rate. When we take a spore print and put it onto a petri dish, or put the agar from the petri dish onto sterile grains, we want and expect success. So, we use sterile technique to take a .0001 percent chance of success and transform it into a 95 percent chance of success.
The Extremely Anal Still Air Box Technique (h/t MycTyson)
By now, you should have your Still Air Box all done up and made. Perhaps you’re a bit baked, too. Don’t worry, we’ll keep it simple.
Now, let’s put everything together as if you were about to do some sterile lab work.
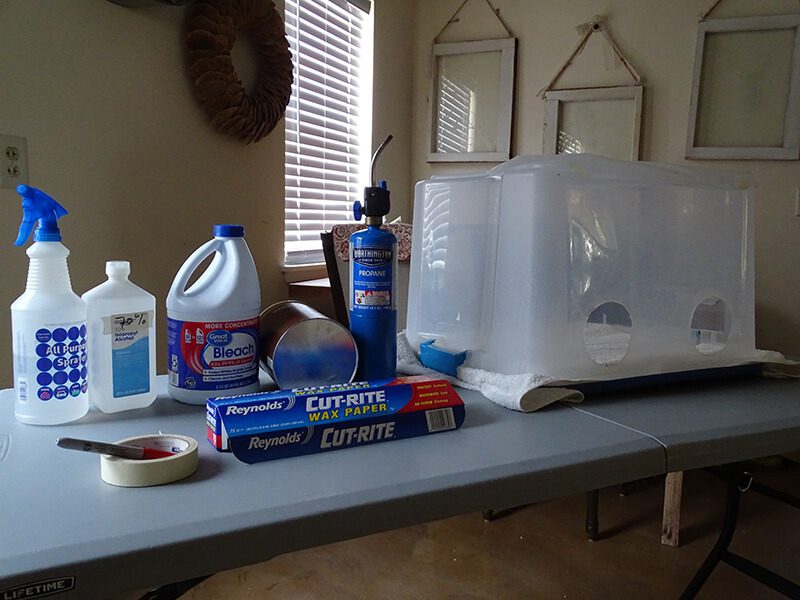
Still Air Box Sterile Technique Equipment List
- Your recently made Still Air Box with arm holes and a locking lid
- White towel
- Bleach
- 70% Isopropyl alcohol in spray bottle
- Paper towels
- Latex gloves (optional)
- Plastic sheeting (like wax paper) pre-cut to a size that will cover the arm holes
- Tape (masking tape works well)
Step 1:
Gather the supplies on the equipment list.
Step 2:
Mix 2 quarts of water with some bleach — follow the directions for the amount of bleach necessary on the back of the bleach bottle, or just use a cap full — in a container.
Step 3:
Put the gloves on (optional) and place the white towel into the solution. Let it become completely submerged.
Step 4:
Spray the inside of your Still-Air Box container with 70% isopropyl alcohol and let air dry/wipe dry with a paper towel. Repeat the same technique with the inside of the plastic container’s locking lid.
Step 5:
Grab the towel and wring it out as completely as possible. You want it damp, not wet!
Step 6:
Place the towel across the inside of the locking lid. Spread it out so it’s flat without any ridges or bumps. You want this to be as flat as possible. It will make your life way easier. Trust us!
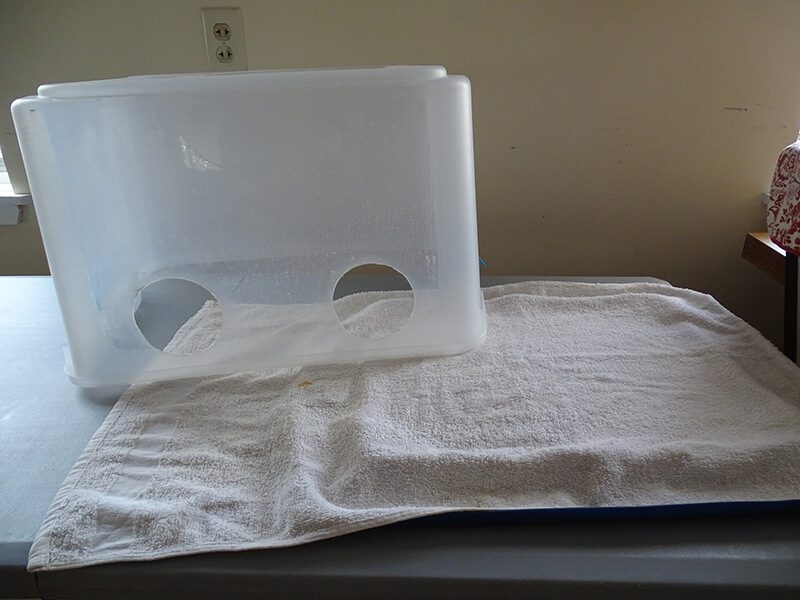
Step 7:
Place your Still Air Box container on top of the lid. Your container should be upside down, with the lid on the table and the container atop. Make sure the towel is still flat and smooth. Now, lock the container into the lid.
Step 8:
Take your pre-cut plastic sheeting, spray it with 70% isopropyl alcohol, wipe dry, and then drape over the armholes. Now tape the plastic sheeting so it stays securely attached to the Still Air Box and covers the armholes completely.
Step 9:
Step back and admire your work. You now have a fully functional Still Air Box for mycology!
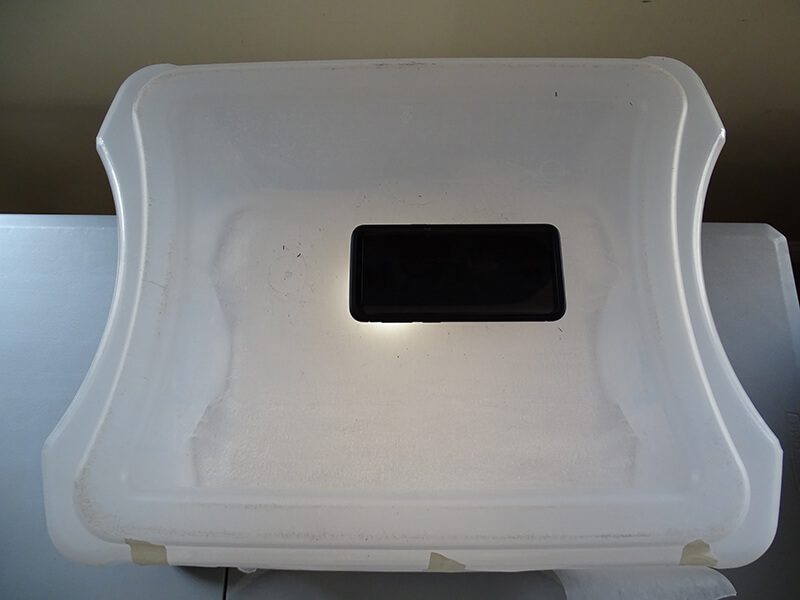
PRO TIP:
If you’re having trouble seeing into your Still Air Box, turn on your phone’s flashlight and place it on top of the container. Voila, now your working space is illuminated!
A Note on Sterile Technique
As many experienced mushroom growers will admit, as you get better and better with your sterile workflow, you’ll probably begin cutting corners. That’s okay and part of the process of becoming more efficient. In fact, some of the most experienced commercial cultivators I know do all sorts of things in the lab that I would never think of doing (no gloves, no mask, no problem).
But for novice growers, try to be as sterile and clean as possible. Contamination and failure are to be expected, yes, but we want success and lots of it! To this end, consider adding in some extra steps like taking a shower before doing any sterile work and wearing a mask while working in your Still Air Box. As you have more success, you can start experimenting with less preparation.
SAFETY NOTE: Do not flame sterilize anything inside your Still Air Box! If there is any lingering isopropyl alcohol floating in the air, it will go kaboom!
Where to Buy a Still Air Box
Making a Still Air Box is easy, but what if you’d rather buy one? They do cost more, but the convenience of getting one shipped at the click of a button is tempting. Plus, they have benefits not found in a DIY Still Air Box!
In our humble opinion, the best Still Air Box on the market is the North Spore NocBox Still Air Box. Use code “FUNGIACADEMY” for 10% off! Jasper has been using the North Spore NocBox including in our in-person mushroom cultivation courses since 2024 with great results.
[Watch: NocBox Still Air Box Review Video]
North Spore NocBox Still Air Box Benefits
- Surprisingly spacious size to work on projects big and small (you can even fit a monotub inside!)
- Lightweight, collapsible material for easy storage and transport
- Large slanted area for easily viewing your work
- Adjustable-fit arm ports for comfort and to minimize a potential contamination point
- Two zippered entry points for easy loading and cleaning
- Side port for corded appliances
- All surfaces are waterproof and easy to be cleaned
Why We Do What We Do
Perhaps you’re reading this and thinking to yourself, “This design is awesome, thank the mushroom Gods for the Fungi Academy.” If so, thank you, you kind soul. Because there is certainly someone out there wondering why the heck we designed our Still Air Box this way. We appreciate an inquisitive spirit, too. So, here’s our reasoning.
We don’t use gloves because they are unwieldy and unnecessary. If you properly sanitize your hands with 70% isopropyl alcohol before they enter the Still Air Box and continually re-sanitize them as you work, everything will be just fine.
We understand that as you move your arms and hands into and out of the box, air will naturally be stirred and move about inside the Still Air Box. That’s why we always take a mindful moment after placing our hands into the box to visualize what we’re about to do. During this visualization period, the air is settling and returning to a “still air” environment.
We also like plastic containers with gaskets and locking tops because it secures your working surface to the container, makes it easy to move, and snuggly seals off the container from the outside world. You can even take your Still Air Box with you when foraging to clone a newfound mushroom on the go!
The reasoning behind the bleach towel is straightforward. The bleach sanitizes the towel, thus giving you a sanitized surface to work on. The towel also works to dampen the blow from stray particles, causing them to settle quicker and get hit with a dose of sanitizing bleach at the same time. It also serves as a backstop for beginners. If you mistakenly place a jar lid or scalpel down on your working surface, you have an extra layer of security because it is a bleached and sanitized towel.
As for the plastic sheeting, we use that to cover the Still Air Box armholes when it’s not in use. For example, after you pour some Petri dishes full of agar, you definitely don’t want to open or move the Still Air Box until the agar cools down and hardens. By spraying the inside of the sheet with isopropyl alcohol and then taping them securely over the armholes, you prevent particles from entering into the Still Air Box.
Download our FREE resource on where to source your mushroom Spores & Cultures

Download the Free Spores & Cultures Guide →
Frequently asked questions
For most home growers, a still air box is all you need. A flow hood runs $500 and up. A still air box costs about $20 and handles agar pours, grain transfers, and liquid cultures just fine. Start here. You can always upgrade later, though most people never need to.
Around $20 and about 10 minutes. You need a clear plastic tote with a locking lid, a metal can to melt the arm holes, something to heat the can, and a marker. Most of that is already in your house. It is the cheapest real upgrade in mushroom cultivation.
No, and we recommend skipping them. Gloves are clumsy and slow. Sanitize your bare hands with 70% isopropyl before they enter the box, then re-sanitize as you work. Clean hands plus still air do the job. Latex just gets in the way.
Go big. A clear tote between 80 and 110 quarts gives you room to work without knocking things over. Taller and wider is better. A locking lid keeps it sealed, and a gasket makes it even more airtight. Cramped boxes cause sloppy mistakes.
It traps the air inside so stray spores and bacteria cannot drift in or settle on your work. Put your hands in, pause a moment, and let the air settle before you start. That calm, semi-sterile pocket is enough to take your success rate from almost zero to around 95%.
Keep Learning
- Mushroom Contamination: How to Spot and What to Do — understand what you’re protecting against.
- Cobweb Mold vs Mycelium — the most common thing growers misdiagnose inside their still air box.
- Best Still Air Boxes to Buy — reviewed and compared if you prefer to purchase one.
- Best Places to Buy Mushroom Spores Online — once your sterile setup is ready, source quality genetics here.
Want to put all of this into practice with expert guidance? Our Online Mushroom Cultivation Course covers sterile technique, still air box workflow, contamination prevention, and every step from spore to harvest — 70+ video lessons, a 130-page workbook, and lifetime access. Or join the Mushroom Membership for live monthly masterclasses with world-class mycologists.
About the Author

Sam is a writer, award-winning journalist and professional mycologist from the United States who arrived at the Fungi Academy one midsummer’s day in 2019 and left six weeks later with lifelong friends and a passion for mushroom cultivation.
In the past three years, he’s built a laboratory and fruiting room in his home, cultivated and foraged over 20 species of gourmet and medicinal mushrooms, started a medicinal mushroom tincture business and returned to the Fungi Academy to teach his techniques to students.


14 Responses
Ive built a bit of a mod. How would it affect contam rates if you were to add a small HEPA blower connected to the box via a 4 inch corrugated aluminium pipe hermetically sealed both at the fan end and at the box end.? So that the air that comes out of the 4 inch hole on the opposite wall has been super filtered from the HEPA blower and the only way it can vent from the box is through and around the armholes.? Would this be an even better way of preventing air ingress from coming into the box via the armholes as is the case in an SAB. In effect this would turn an SAB into a positive airbox.? I would really value your thoughts as it was your Youtube video that inspired me and I loved the bleach soaked towel ….. Ingenious.
not according to most mycologists. The still air box and the flow hood principles are mutually exclusive as they work on different principles. The Still air box requires still air- as few drafts and disturbances as possible. Obviously a blower screws this up. The still box has lots of contaminants in it. We are trying to get them out of the air and onto the ground by not allowing any drafts in the area we work. A blower will keep this form working even if the new air is filtered properly.
You either need 100% free flow without any box, or you need complete stillness.
“The Extremely Anal Still Air Box Technique (h/t MycTyson)”
Haha anal haha
Som eoine please answer Mark’s question above…. it’s a good one.. I have some people cut a hole there the size of their hepa air purifiers into the bottom of box, then leaning the box on its side so that the air purifier is blowing air into the open box towards you, creating a flood hood with giant sorta funnel like shape with the sides serving as a shield to keep air from entering the laminar flow giving a s pa ce to work in that is supposed to be totally sterile. Due to the way that the purifiers are shaped, with varying sized fan air ports erc this doesn’t always work but some people have had a lot of success and use it for years, Lastly, if you wanna go rally cheap… tape a big trash bag on the air outlet of your fan /air purifier aw so that it inflates the big bag as its blowing clean air into it.Then you can cut open a hole 32 3, big enough to get your hands in but smaller enough to where the bag still inflates and vola…. still” clean air trash bag thing: youtube it,, its out there lol
You don’t achieve laminar flow at such a low rate of flow. I think this is a large benefit of the flow hood/box.
Hi Mark
I’m trying to learn the ins and outs of home mycology. I have spent a not trivial amount of time reading about Still Air Boxes (SAB) and their big brothers: Laminar Flow Hoods. Here is my answer to your question as I simplistically understand it.
The laminar hoods achieve a clean work area using two key features. First, a HEPA filter removes dust, spores, and other possible contaminants. Second, this air is made to flow into an open work area in laminar flow columns. If this clean air was just blown out with turbulence, it would do little to provide a clean work area.
SABs work by keeping the air still, thus reducing air-borne contaminants. Introducing moving air somewhat defeats the point of still air boxes as I understand it.
How about a small fan just to mantain a small positive pressure inside ?
no. you want nothing disturbing the air in any way inside. Nothing. You don’t even want to move your hands real fast. If you are concerned about air coming in the holes, you can get sterile or air flow proof arm sleeves made of various materials that allow you to close off the holes without adding the bulk and dexterity liabilities of adding full gloves. Sleeves can let you seal off the air without harming your hand work precision.
Could use additional help on the plastic sheeting portion of this. Is it attached on the inside or outside? What is used to attach it and can you use wax paper?
Thank you for this guide
I am just trying to get started in growing mushrooms for better health and to start a business for extra income or more
Wow! Definitely useful information. I have always loved mushrooms and have fond memories of foraging for them in Poland as a child. I have begun this wonderful hobby 3 months ago and have one successful grow under my belt. Thanks for helping people like myself.
It will actually be a pleasure to connect with you
Feel free to connect to us! connect@fungiacademy.com
Thank you for the straightforward instructions on building my own Still Air Box.