
Quick answer: The Hoodie Tek is a simple, low-maintenance fruiting method for growing mushrooms at home. You mix colonized grain spawn into a substrate grow bag, let it colonize, add rubber bands near the top, cut a slit to fruit, and harvest. After each flush you tuck the bag’s cut top back in like a hood, recreating the humid, high-CO2 conditions that primordia love so later flushes stay prolific and protected from contamination.
There’s a new mushroom cultivation technique in town that’s simple, discreet, scalable, can fruit almost any mushroom species, requires practically no maintenance until harvest, and is helping people grow magic mushrooms at home with minimal time, effort or prior experience.
Meet the Hoodie Tek, a game changer for people looking to grow magic mushrooms at home.
New to cultivation? Our step-by-step How to Grow Magic Mushrooms guide walks through the whole process from spore to harvest — and the Hoodie Tek is one of the simplest ways to handle the fruiting stage.
A modification of the top fruiting growing method, the Hoodie Tek has taken the magic mushroom growing community by storm lately. Along the way, cultivars have found great success fruiting gourmet and medicinal mushrooms, too.
And a few weeks ago, our vagabond mycology reporter Sam the Mushroom Man sat down for a chat with Jesse Noller, Hoodie Tek inventor/innovator and founder of Humble Fungus, a Colorado-based state-of-the-art mushroom farm and mycology supply company.
Hop on the Hoodie Tek hoverboard and let’s ride to the forest!
Imitation is the Greatest Form of Flattery
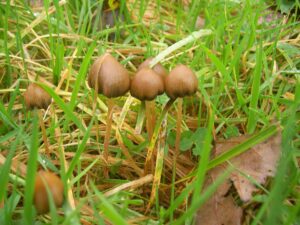
When attempting to grow magic mushrooms at home, you want to, as closely as possible, mimic the environment where your mushroom species naturally grows. With that in mind, let’s start at the ground— or in this case, the forest floor—and work our way up.
As you enter a forest and walk beneath its canopy of towering trees, your feet tussle and turn the ground. With each step, a mixture of loose, partly decayed organic matter like leaves, sticks, dead organisms and broken up but unavailable minerals scatter about. Here on the forest floor, fresh air and oxygen are plentiful, humidity is relatively low and the surface is typically alkaline. This is where your mushroom babies—known as primordia or “pins”—begin to form.
Now drop into a deep yoga squat and begin digging a bit deeper. Right below this top layer you begin to reach the real living soil, humus. This living layer is dark brown or black, dense, moist, and exudes a powerful earthy smell characteristic of decomposing carbon-rich plant and animal matter. In this CO2 and moisture rich environment, the hidden life of mycelium unfolds.
To successfully grow magic mushrooms at home, you must recreate both of these environments. Let’s start where mushrooms do: amid the living soil where mycelium thrives.
When you make a kit from which you’ll grow magic mushrooms at home, your goal is to end up with a well-hydrated, sterile, CO2 and nutrient-rich environment perfect for mycelium. Today, this is typically accomplished by packing a grow bag with pelletized hardwood (e.g. sawdust) that’s then supplemented with soybean hulls, wheat bran, alfalfa pellets, coffee grounds, etc. The list is practically endless, especially with Oyster mushrooms.
Next, the hardwood mix is hydrated with water, sterilized in an autoclave, and then inoculated with a mycelium culture. As the mycelium starts munching its meal, CO2 levels begin to rise.
Yet as with all life, things inevitably change. Eventually, the mycelium devours its sawdust serving and the moment arrives when it’s time to coax the mycelium into ceasing its binge and turning its attention toward a more noble end: making mushrooms!
Before mycelium matures into mushrooms, it forms a smattering of hyphal knots, also known as primordia. In nature, this happens not so much in a specific layer of forest floor. Rather, this magic maturation happens in the blurred border between the forest’s surface layer and the earthy smelling humus. Here, CO2 and humidity levels are high, perfect for the formation of plentiful primordia that later lead to full canopies of beautiful bountiful mushrooms.
Your grow bag already has these conditions. But when it’s time to harvest, most cultivars slice open the bag. As a result, humidity and CO2 dissipate, creating a more difficult situation from which your mycelium must recover and fruit again.
ENTER THE HOODIE TEK!
More than many other grow techniques, the Hoodie Tek recreates the high humidity and CO2 environment inside your bag after you’ve already sliced open the bag.
So, let’s get out of theory and into the real world, no?
Without further ado, let’s learn how to Hoodie Tek.
Free Beginner’s Guide
Grow your first mushrooms — for free
Get the free guide that walks new growers through the whole path — plus 5 free videos to send you on your way.
- The exact gear you need — and the pricey stuff you don’t
- Where to source spores & cultures without getting scammed
- How to spot and beat contamination before it wipes out your grow
How to Grow Magic Mushrooms at Home Via Hoodie Tek
EQUIPMENT:
- 1 bag or jar of colonized grain spawn of a mushroom species of your choice
- 1 bag of pasteurized or sterilized substrate in a grow bag (Noller recommends a 3T Unicorn grow bag)
- The species you’re growing will determine the substrate recipe and whether you sterilize or pasteurize the substrate
- Scissors, pocket knife or box cutter
- 70% isopropyl alcohol
- 1-2 medium sized rubber bands
OPTIONAL:
- 60ml sterile syringe
- 60ml sterile or distilled water
- Sterile syringe needle
PRO TIP:
For best results, use a 1:1 or 2:1 ratio of pasteurized/sterilized
substrate to colonized grain spawn
We’re assuming you have a Still Air Box or flow hood and are all set up with your bag or jar of colonized grain spawn and bag of
pasteurized or sterilized substrate.
STEPS
Make Your Bag
1. Make sure your work space, arms and hands are sanitized and your equipment—scissors, substrate, etc.—are sterile or sanitized with 70% isopropyl alcohol
2. Carefully open your bag or jar of colonized grain spawn
3. Carefully open your bag of pasteurized or sterilized substrate
4. Pour the contents of the bag or jar of colonized grain spawn into the bag of pasteurized or sterilized substrate

5. Thoroughly mix the grain spawn with the substrate so that the grain spawn is evenly distributed throughout the bag
6. Jostle and gently tamp the substrate-spawn mixture until it forms a uniform block and is moderately compact
7. Seal, clip or use a twist tie to close the bag
8. Wait for your bag to colonize. This typically takes about 2 weeks.
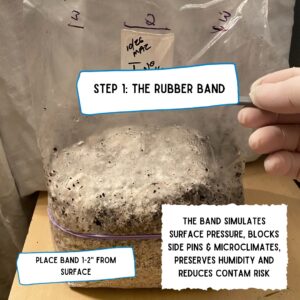
9. Take your rubber bands and place them around the colonized block about 1 to 1.5 inches from the top surface of the block.
Prepare Bag for Fruiting
10. Cut a 2 to 3-inch slit either directly below or directly above the filter patch on your mushroom grow bag.
11. Place your mushroom grow bag into your fruiting environment, if applicable. Don’t worry if you do not have one. This technique makes such an environment unnecessary but if you have one, use it!
13. Let the bag sit for 3 to 7 days until primorida—i.e. pins or baby mushrooms—develop on top of the substrate block.

14. As your baby mushrooms begin to grow, start gradually increasing the width of the slit you made in the bag’s top in Step 10.
15. Once your mushrooms start to develop stems, you can then decide if you want to continue gradually widening the slit or simply cut across the entire front half of the bag and the side accordion folds. If/when you make this cut, make sure the back of the bag remains attached.
16. You can also decide to wait to make this cut until you harvest your first flush of mushrooms.
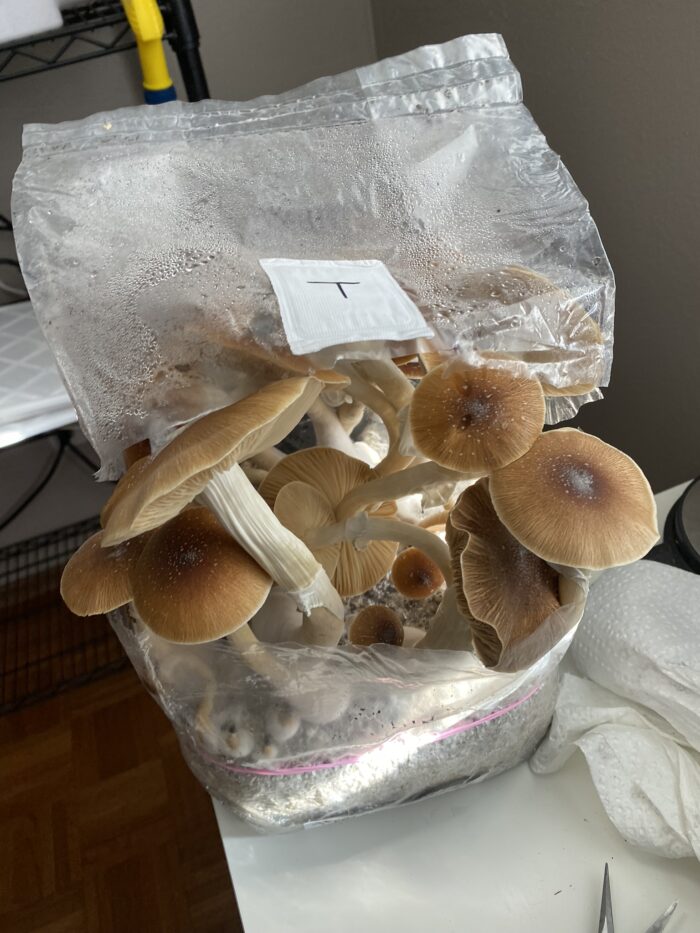
17. If you have made the full front and side accordion cut, fold the top of the bag back and keep the grow bag in a humid environment.
Harvest Your Mushrooms
18. Wait for your mushrooms to fully mature, then harvest your bag.
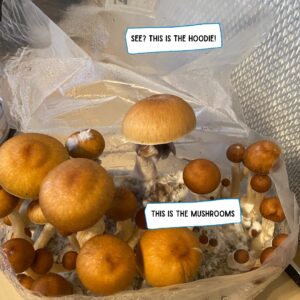
19. After harvest, return the bag top over the block by tucking the bag’s sidewalls inside the top part of the bag that is cut open. The top section of the grow bag that is halfway cut is like a hood, hence the name the Hoodie Tek.
20. Wait for your block to develop another set of primorida as in Step 12, then repeat the process of gradually opening the bag again until it is time to harvest your second flush. Repeat until the bag stops producing flushes of mushrooms.
PRO TIPS:
21. After your first harvest, you have the option of covering the top of your substrate block with a thin casing layer of pasteurized peat moss, which will create that buffer layer and environment perfect for primordia formation. Noller makes sure his casing layer (mostly peat moss with small amounts of gypsum, lime, perlite and vermiculite) has a pH of between 7 and 8 to discourage trichoderma contamination.
22. You also have the option of rehydrating your block after each harvest. Noller does this by injecting 60ml of sterile water directly into the center of his substrate block with a sterile syringe and needle. Noller prefers this direct injection approach to the soak/dunk approach common in monotub grows since the direct injection prevents water from pooling on the bottom or side of the bag, which can be a breeding ground for contamination. After the injection, simply seal the hole in your bag from the needle puncture with tape.
It’s All Good in the Hoodie
So, why does this technique work so well when trying to grow magic mushrooms at home?
First, let’s address the rubber band. Like we mentioned earlier, we’re trying to mimic the natural environment mycelium and mushrooms enjoy in the wild.
Atop the forest floor, there’s not much downward pressure. But sink a few inches deep, and the pressure drastically rises. By wrapping a rubber band around the block about 1.5-inches below the top of the substrate block, a pressure gradient is created that signals to the mycelium which way is up, much like light is used in mushroom growing for the same purpose.
The rubber band also keeps the bag tight against the substrate block.
This is vital because as the mycelium pulls moisture from the substrate to form mushrooms, the substrate shrinks.
The space between bag and substrate created by this shrinkage is perfect for primordia formation–humid, CO2 rich air–and is the main cause of the dreaded side pins, when primordia begins to form along the side of your bag. By using rubber bands to keep the substrate and bag together, side pins are avoided.
Aside from the space efficiency, discreetness, and the ability to fruit your bag anywhere—from a professional grow room to a kitchen counter—the real Hoodie Tek magic happens when you tuck the top of the bag, the “hoodie”, back into the rest of the bag after the first harvest.
Typically when you fruit mushrooms, you either cut a slit in the sidewall of the bag for shelf fungi like Pink Oysters, or you slice the entire top of the bag off and fruit directly from the top of the substrate. Both approaches have a major drawback: after the first harvest, your bag remains open and your substrate is exposed, desiccating, vulnerable to contamination and situated in an oxygen rich environment. None of these factors are ideal for primordia formation and a robust second flush of mushrooms.
But where other techniques stumble, the Hoodie tek shines.
By tucking the bag back inside the top “hoodie” part of the bag after the first harvest, you recreate the high CO2 and humidity environment perfect for primordia formation and prevent contaminants from falling onto your exposed substrate. Done this way, your subsequent flushes are more prolific and efficient.
So what are you waiting for? Go give the Hoodie Tek a try next time you try to grow magic mushrooms at home.
Heck, experimentation is what created the Hoodie Tek in the first place, Noller says.
“This idea is an evolution of all of these tips and techniques that we sort of generated,” Noller said in a Fungi Academy interview. “It just ties back to our entire mission of making this accessible to everyone so you don’t have to go out and make your own tub. You don’t have to worry about misting it all the time. It’s really just a very simple, scalable way to be able to do everything that we want to do with a lot less fuss. I really encourage everyone to give it a try and let us know how it goes. I want to see what people do with this.”
Or as I love to say: “Give her a rip, see what she’ll do.”
About the Author
Sam is a writer, award-winning journalist and professional mycologist from the United States who arrived at the Fungi Academy one midsummer’s day in 2019 and left six weeks later with lifelong friends and a passion for mushroom cultivation.
In the past few years, he’s built a laboratory and fruiting room in his home, cultivated and foraged over 20 species of gourmet and medicinal mushrooms, started a medicinal mushroom tincture business and returned to the Fungi Academy to teach his techniques to students.


19 Responses
Where can i find a “starter” kit….
You could try humble fungus, based in Colorado. Or you could very easily make one yourself. By taking our online course you would have all the know how to make these yourself for pennies on the dollar.
Great teaching. Freaking smart. Thank you!
I’m horrible at growing anything, I was micro dosing for med resistant depression it was helping now I’m out& can’t find from trust worthy person.Im trying to find the quickest and most idiot proof I can
Thought I saw some a while back that were half grown, really what I need, have no idea what it was called or what I’m doing 😭
hi. my ig is zoosmoke420. I’m new to growing shrooms. I want to make very potent and strong dose mushrooms. what spore syringes u suggest I get. my wife says get Copeland. don’t know if they go .. thank u
Awesome article!
I’m actually in the process of using this tek and I’ve noticed half the bags aren’t colonizing after about 11 days. Very puzzling… all from the same batch of spawn, field capacity is good, temperature’s on. If anyone has any tips I’d be very grateful 🙏🏼
Astral
Your grain spawn most likely had contaminants that’s why all of your bags have stopped colonizing.
Looking to grow lb or more. Upstate New York
THank you for this, this is brilliant.
I’m wondering if this method is suitable for growing the PE strain?
Sure is Josh! Happyy growing
very beautifully explain.
Is it possible to grow amanita muscaria in that bag?
Amanita are mycorrhizae, not able to cultivate any of those 😉
Well, you’re not going to have success with Indoor cultivation of Amanita muscaria unless you have a small spruce in a pot and then inoculate the soil. But it is perfectly possible to cultivate them outside if you have pine trees in your garden. Just mix up water, some malt extract etc. and one or two Fruitbodys of AmMu’s in a blender. Then you pour the mixture into a watering can, add 1-3L of water and then inoculate the soil around the bases of the younger trees and the areas around them. If some of the roots are visible it’s possible to make small cuts in them with a razor before you pour the mixture on top of the slized roots;) if you inoculate in early spring it’s possible to get a harvest in early spring. If not then the next year starts of with AmaMu’s.
What! I’ve never heard of this, who’s succeeding with this technique?
Can u use any grow bag or does it have to be specific??
The Unicorn bags work the best
medium sized rubber bands. A size # ?
Muitíssimo interessante e de grande valor, simples-facil-pratico . Para aficionados por fungos. Artigo moderno, evolutivo e atualizado para os dias de hoje !!